This series is dedicated to providing direction for applying Project Management principles to starting a Business Continuity or Disaster Recovery (BC/DR) Program. This is the second installment of a multi-part series. In this installment we will focus on the Project Planning phase. The first installment of this series can be reviewed by clicking here. Subsequent segments will be aimed at additional phases of starting a BC/DR Program, on improving an existing BC/DR Program, and on elevating a mature program to a new level of efficiency and effectiveness.
It is important to understand that the project planning phase is a critical part of managing the project. Many projects fail before they begin due to inadequate planning at the outset. Consider that you may deliver an incredible collection of project deliverables that check all the boxes for management in regards to content, presentation, and usefulness, but if those deliverables are provided late and/or over budget, the project will be considered a failure. This needs to be spot on for success. The quality of the deliverables, their timeliness, and the adherence to the established budget all need to be in line with the plan provided to management. In addition, this phase may be the most difficult to execute successfully, especially for those new to project management.
Here are some of the items that need to be developed in the project planning phase:
In many ways each of these items is a project plan within the overall project plan. The individual documents allow the management of the major aspects of the project. It will take a considerable effort to develop them, but the work will be rewarded as they will serve as resources as the project progresses enabling you to stay on plan.
A WBS is a hierarchical breakdown of the deliverables of the project. In creating the WBS, focus on the end goal and stay high level. The WBS simplifies the project into manageable pieces that can analyzed for cost and efficiently managed for completion. The WBS is a graphic representation of the project scope. To start out, name the project and list the major deliverables under the project title. Our project can be named Create a Business Continuity Program. Earlier we identified three deliverables:
With the highest levels of the WBS graphed, focus on breaking down each major deliverable into smaller elements. A good rule of thumb for breaking down the major deliverables is called 8/80. The smaller elements of the deliverables should take between 8 and 80 hours of work to accomplish. Go no smaller than eight hours for an element. If an element takes longer than eighty hours, continue to break it down into smaller parts. In addition, each work element should be completely independent. There should not be any overlap between elements; each should be unique. The elements may need to be broken down to different levels. Some elements may require multiple levels of breakdown while others require none or few levels. Do not feel as though all the segments need to be broken down to the same level.
Once the deliverables are broken down according to the 8/80 rule, attach a percentage representing the amount of work that element requires in relation to total work required for the project. Indicate the budget allocated for that element as well.
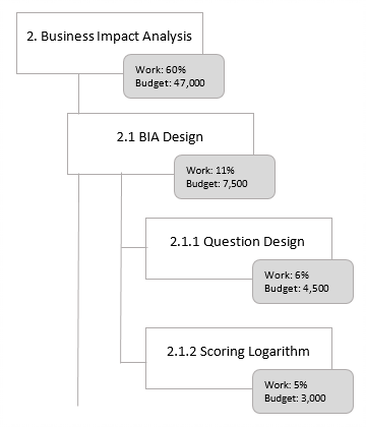
The 100% rule should be applied to the WBS. The 100% rule holds that the top level of the WBS represents the total work and budget of the project. The rule also holds that each level of the WBS should also represent 100% of that level’s total work and budget. See below.
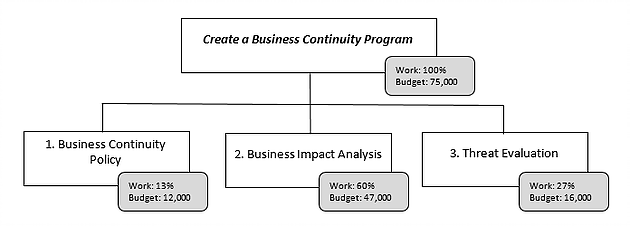
The high level deliverables should add up to 100%. The levels below must also add up to 100%. Here we can see that 2.1.1 and 2.1.2 add up to 100% of the work and budget for level 2.1.
There are many websites that provide information about creating Work Breakdown Structures. Most include examples and templates that can be downloaded.
Milestones are key events in the lifetime of project. Mapping milestones and comparing progress to them ensures that you are not too deep into the details of the project and are keeping the overall project on course. The milestones of the project include critical deadlines, key dates unrelated to deadlines, and deliverables. A milestone chart is great for reporting and presenting to management since it summarizes the key stages of the project without getting too detailed.
Identifying the milestones involves setting a sequence to the major elements of the project. To create a comprehensive milestone chart, refer to the work breakdown structure, but understand that milestones are not isolated to only items in the WBS. Consider also key organizational events and initiatives that overlap your project. Also consider any periods in which the project team will need to focus its time and effort on other unrelated activities.
The timeframes for completing each milestone will vary greatly by the size of the organization and the staff that will perform the project activities. The ability to outsource portions of the project is also a factor to be considered. In calculating the expected dates for the project milestones, consider required predecessors. Milestones will commonly require that one or more other key activities, deliverables, or other milestones are complete.
There are multiple templates available for milestone charts. The link below provides templates for MS Office.
https://templates.office.com/en-us/Project-timeline-with-milestones-TM00000009
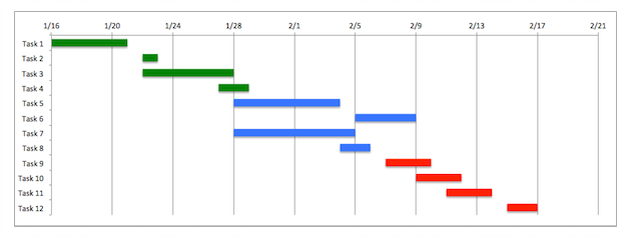
A Gantt chart further breaks down the items in the work breakdown structure into tasks with defined timelines for completion and relationships to other tasks that serve as predecessors and/or successors. A Gantt chart can also be used to identify the resource(s) responsible for completing each task.
In a Gantt chart, each tasks is represented on a row. A timeline appears along the top or bottom of the page, and a bar is drawn on the task row to a length representing the length of time required to complete the task. The graphic below is a very rudimentary sample.
There are multiple software programs available for creating Gantt charts and many templates for creating them within MS Office. Here is a link explaining how to create a Gantt chart in Excel. If you feel it is important to link tasks together, visibly display connections between tasks and milestone icons, track resources, and involve constraints, it may be best to use a project management software program.
To create the Gantt chart, add the major elements from the work breakdown structure; then break out each major element into the individual tasks required. Prioritize the tasks in accordance to how they may relate to each other and which tasks may be predecessors to other tasks. In some cases tasks may need to be completed in tandem, but for our BC/DR project, linked tasks will most often have a finish-to-start relationship. In a finish-to-start relationship, the predecessor task needs to be completed before the successor task can be started. More information about task links is available here.
Review each task and draw the bar for each to represent the duration for the task. Determine the resource responsible for performing each of the tasks. When complete, review the resources assigned to tasks to ensure that no resource is over-allocated.
The Cost Management Plan summarizes how project costs will be controlled. The plan is not simply a summary of the expected costs for the project. It includes a description of the method and manner in which costs are being estimated, and how the available budget will be periodically utilized. It includes the estimated cost of each activity and a schedule of when costs will be incurred. It also defines who has the authority to change the cost management plan and the procedure for how the costs are changed. The cost management plan should also define how costs will be reported and how often. Leverage the work breakdown structure in creating the Cost Management Plan. In creating the WBS the budget amounts should have been tagged to each task.
For the BC/DR project, examples of cost contributors are the wages of the staff involved in the project, the purchase and implementation costs of any BC/DR and/or project management software (if applicable), the costs of outside consultants (if applicable), printing costs, the price of access to references such as those associated with historical disaster data, the wages of those who will be interviewed for the BIA, and the wages of those who will review and approve the BIA. Travel may also be a cost depending on the delivery method for the BIA, and if travel is needed for the threat evaluation and/or meetings to present on the status of the project or the final project findings. Your organization may have its own standard policies for what contributes to project costs. For example, some organizations do not account for internal staff when determining the cost of a project. Assuming that your organization does account for internal staff in cost planning, ensure that you include the time it requires to update the project planning documents and the status reporting required of management. These activities are essential and should be part of the overall project cost.
Determine if your organization has a template for creating a cost management plan. A template will greatly simplify the process. If your organization does not have a template, there are a multitude of templates available on the web.
A cost variance action plan may be required for the cost management plan. The cost variance action plan designates actions and identifies individuals responsible if the costs of the project begin to escalate beyond the original plan. The cost variance action plan sets specific percentage category ranges and defines actions and escalation points of contact based on how far the cost of the plan has deviated from the original plan.
Determine if your organization requires your cost management plan to incorporate cost performance or cost variance metrics. If so, there are a few additional project management concepts with which you will need to be familiar:
Schedule Variance (SV) is the completed work to date compared to the planned schedule. We calculate the Schedule Variance by subtracting the Planned Value (PV)from the Earned Value (EV).
Step 1: Determine the Planned Value (PV) for the project. Planned Value is calculated task by task for each task that should be completed at the current point of the project. We need to look at each task and determine what percent complete it should be given the current date.
Look at the example below:
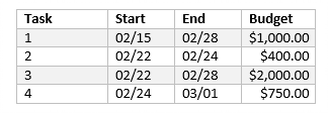
Let’s assume that it is March 1st. The Planned Value (PV) for the tasks that were planned to be completed by March 1st is $4,150. This is simply the total budget amount for all project tasks that should be completed as of today. (If the date fell within the start and end date for any task, we would need to calculate the per cent of the task that should be completed by the date.)
Each of the tasks above should be complete; however, Task 2 is only 75% complete, and Task 4 is only 50% complete. Tasks 1 and 3 are 100% complete. Now we can calculate the Earned Value (EV) of the tasks by multiplying the planned budget amount for the task by the percent completed of the task.
Task 1 = $1,000 x 100% = $1,000
Task 2 = $400 x 75% = $300
Task 3 = $2,000 x 100% = $2,000
Task 4 = $750 X 50% = $375
The Earned Value (EV) = $3,675
Now we can determine the Schedule Variance (SV)
Schedule Variance = Earned Value (EV) – Planned Value (PV)
Schedule Variance (SV) = $3,675 – $4,150
Schedule Variance (SV) = -$475
A negative Schedule Variance indicates the project is behind schedule.
Cost Variance (CV) is the difference between the Earned Value (EV) and the Actual Cost (AC) of the project. If the cost of the project is over the budget projection, the Cost Variance will be negative. You can determine the Earned Value for the project by multiplying the total budget of the project by the percent complete for the project. For example, let’s say we have completed 15% of the project, and the total budget for the project was $75,000. To date, we have spent $10,000.
Step 1: Determine the Earned Value (EV) of the project.
EV = Project Budget x Percent Complete of the Project
EV = $75,000 x 15%
EV = $11,250
Step 2: Determine the Cost Variance (CV) of the Project
CV = Earned Value (EV) – Actual Cost (AC)
CV = $11,250 – $10,000
CV = $1,250
The project is currently under budget by $1,250.
There are multiple resources available on the web for providing project metrics like those above. Here are just a few:
https://edward-designer.com/web/pmp-earned-value-questions-explanined/
The communication plan defines the data, frequency, and methods utilized for delivering information regarding the project. Communication is essential to keep stakeholders informed and to manage expectations. To develop your communication plan, start with documenting the audiences with whom you will need to communicate. For the BC/DR project, this may include the following:
The Project Team – people working on and overseeing the project
Vendors – external organizations providing services for the project or systems like a BC/DR software
BIA Participants – those people who will perform assessments of business processes
Site Managers – individuals who may be helpful in performing the Threat Evaluation
IT Management – individuals who will be interested to know the business needs for system and infrastructure derived from the BIA
Vendor Management – individuals who will be interested to know the business needs for external organizations derived from the BIA
Department Heads – department leads who will review and approve BIAs and will need to understand their RTOs and the dependencies on their processes
Project Sponsor – the individual who approved the project and may be funding the project through their assigned budget
The list of possible audiences is varied; thus the type and frequency of information delivered will vary as well. Meet with the audiences to determine what type of information they would like to see and how often it should be delivered. Also, discuss the method of delivery. E-mail, reports, in-person meetings, and virtual meetings may all be utilized for project communication.
To manage the communication requirements, it may be advantageous to create a communication matrix.

Adopt a standardized format for all communications. Adhere to the defined format and remain consistent throughout the project. If available, utilize a site on the organization’s intranet to store all communications and project-related documents. Socialize the URL and provide links in the communications delivered.
Once the communication plan is developed, consider adding key communication activities to the Milestone and Gantt charts. Create recurring reminders in your e-mail/calendar program to help ensure communications are executed according to schedule.
The Risk Management Plan identifies the risks that pose a threat to the success of the project and captures related remediation activities. For the BC/DR project, create a risk matrix. The risk management matrix will facilitate the capture of risk information for the project. Include the probability of each risk and a measure of the impact the risk would have on the project if it were realized.
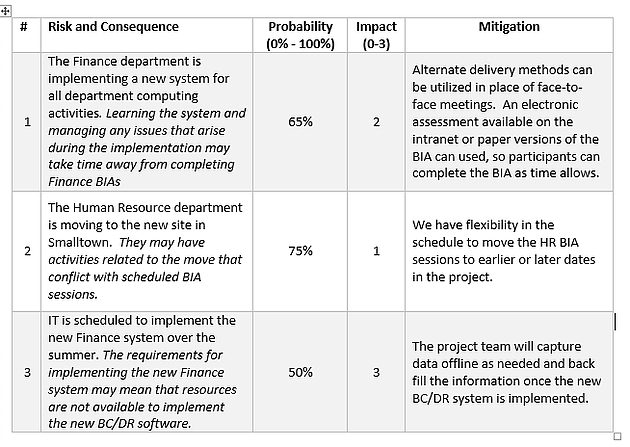
The probability ratings can also be captured as ‘low’, ‘medium’, and ‘high’. Tasks with high probability and high impact are the primary concern. These tasks can set the project back significantly or even require that the project be terminated. Rank the risks in terms of probability and impact to facilitate efficient management of the project risk. Think through the mitigation strategies carefully to ensure your project can be completed successfully.
Tasks from the mediation column of the risk matrix should be added to the project plan as they become applicable. Be proactive wherever possible: if steps can be taken to avoid a risk, add those tasks to the project plan, and carry them out as if they were part of the normal work required. New milestones may be necessary if any of the remediation activities are required in response to a realized risk.
With the risk management plan completed, you are through the project planning stage. Keep in mind that each of the materials developed in this phase are living documents that will need to be updated regularly throughout the life of the project. If managed properly, they will serve as valuable resources to help ensure success.